
This is a step by step guide to set up Pi-hole in a high availability environment. Previously I was using a lone Raspberry Pi 3B to run Pi-hole. The issue with this setup was, if that pi went down, DNS was down on my network, which is definitely unacceptable. So let make it better!
Prerequisites
Since I am running this in a Proxmox LXC, I need to install curl and rsync. A more typical debian or ubuntu install should already have these utilities installed.
1
sudo apt update && apt upgrade -y && apt install curl rsync -y
Once curl is install, I can continue with the install.
Installing Pi-hole
I prefer to run Pi-hole natively as an application, rather than in Docker. To do this I typically follow their official install documentation. Basically though, it boils down to running this command with sudo.
1
sudo curl -sSL https://install.pi-hole.net | bash
When you run the install command, a GUI will appear. It will guide you through the install process. Remember you will need to have a static IP to correctly host Pi-hole, so either set that in your environment, or use a static DHCP reservation. I use the default settings for the rest of the install and once it is complete, I always reset the password for the Pi-hole admin panel using the following command.
1
pihole -a -p
Lastly, you’ll want to add your user to the pihole group so that you can edit configuration files without needing sudo. This will be useful later.
1
sudo usermod -a -G pihole <username>
Configuring Pi-hole
Always enable dark mode in Settings > API / Web interface > Web interface settings.
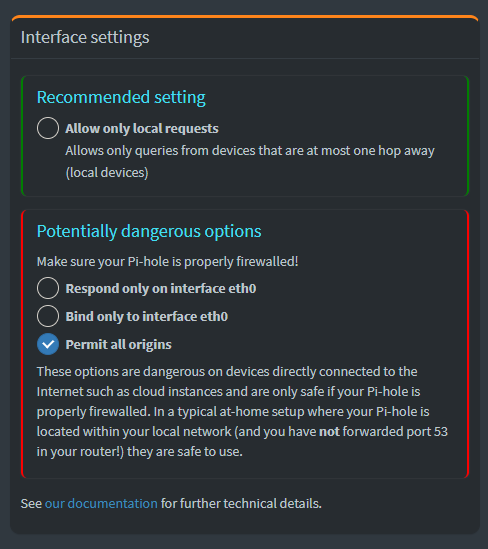
Because my network sets DNS per client, and not just per gateway, each client will make DNS requests directly to my Pi-hole instance. This is better for logging, but means that Pi-hole needs to be behind a firewall, and must permit all origins. This can be configured in Settings > DNS > Interface Settings
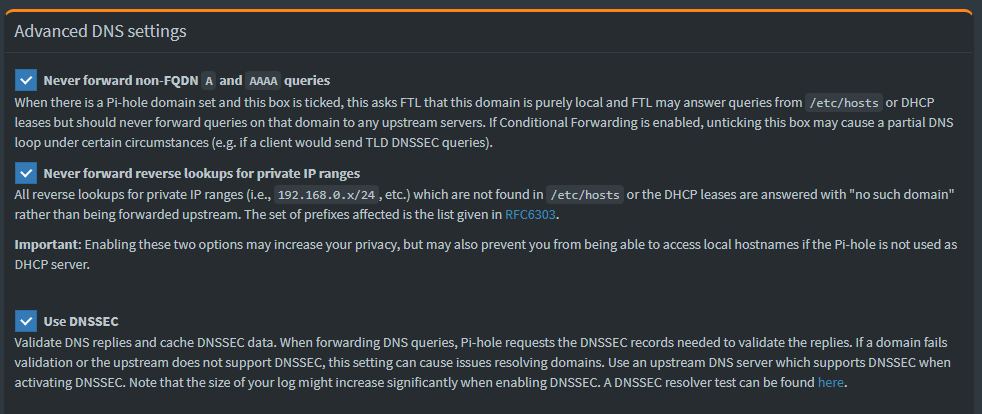
I also like to turn on DNSSEC in Settings > DNS > Advanced DNS settings. This will add a little extra assurance on DNS lookups.
Redirect to Admin
The last change that I make is to redirect HTTP requests to the root path to the pihole /admin path. I find it annoying this isn’t done by default but it’s an easy fix. Simply add the following line to the lighttpd.conf file.
1
sudo nano /etc/lighttpd/lighttpd.conf
1
url.redirect = ("^/$" => "/admin" )
High Availability with keepalived
To have a high availability cluster, you will need more than one Pi-hole instance running. Once you have them both running, you can configure keepalived to set up a virtual IP between them using a technology called VRRP. It allows both servers to share a virtual IP between them, swapping instantly when one of them goes down. Because this is more of a “hot spare” methodology, one node will be primary, and the rest will be secondary. To get started you will need to install two packages.
1
sudo apt install keepalived libipset13 -y
By default keepalived will only swap over if the entire node is down. What we really want is failover when the DNS services are down. To enable service failover we will need to have keepalived run a script, which requires a script user.
1
2
groupadd -r keepalived_script
useradd -r -s /sbin/nologin -g keepalived_script -M keepalived_script
Once the user is created, we can edit the configuration file
1
sudo nano /etc/keepalived/keepalived.conf
Here’s an example of the configuration file. Let’s break it down.
1
2
3
4
5
6
7
8
9
10
11
12
13
14
15
16
17
18
19
20
21
22
23
24
25
26
27
28
29
30
31
32
33
34
35
global_defs {
   max_auto_priority
   enable_script_security
}
vrrp_script dns_healthcheck {
  script       "/usr/bin/dig @127.0.0.1 pi.hole || exit 1"
  interval 2   # check every 2 seconds
  fall 2       # require 2 failures for KO
  rise 2       # require 2 successes for OK
}
vrrp_instance pihole {
  state <MASTER|BACKUP>
  interface ens18
  virtual_router_id 30
  priority 150
  advert_int 1
  unicast_src_ip 192.168.1.51
  unicast_peer {
    192.168.1.52
    192.168.1.53
  }

  authentication {
    auth_type PASS
    auth_pass <password>
  }

  virtual_ipaddress {
    192.168.1.50/24
  }

  track_script {
    dns_healthcheck
  }
}
| Line | Description |
|---|---|
| 1 | The first thing to configure is global definitions. We need to enable scripts and auto priority. |
| 5 | Then configure the health check script. This script will make a DNS query and return 1 if it fails. keepalived will interpret any response other than 0 as a failure |
| 11 | The instance name. I have it set to pihole. |
| 12 | You will need to decide the node’s default disposition, whether it is the master node or a backup. Keep in mind, the node’s disposition will change as necessary based on other nodes. If another node enters the cluster with a higher priority, it will always become the master node. |
| 13 | The name of the interface that the virtual IP will be bound. Can be found using ip a. |
| 15 | The priority will configure which node is the Master. The master node will always be the node with the highest priority |
| 16 | The advertisement timespan in seconds. |
| 17 | The current node IP IP |
| 18 | The other nodes IPs |
| 23 | Node authentication. Keep in mind this is unencrypted, which is why we specify the other nodes by IP |
| 32 | The script to run to verify DNS is live |
Never set an IP reservation for the virtual IP, or set it as a static address for another device
Also keep in mind, this is set up for unicast, but can be configured for multicast. I just like to be explicit. You can find more details about keepalived configuration here.
Once it’s configured, restart the service
1
sudo systemctl restart keepalived
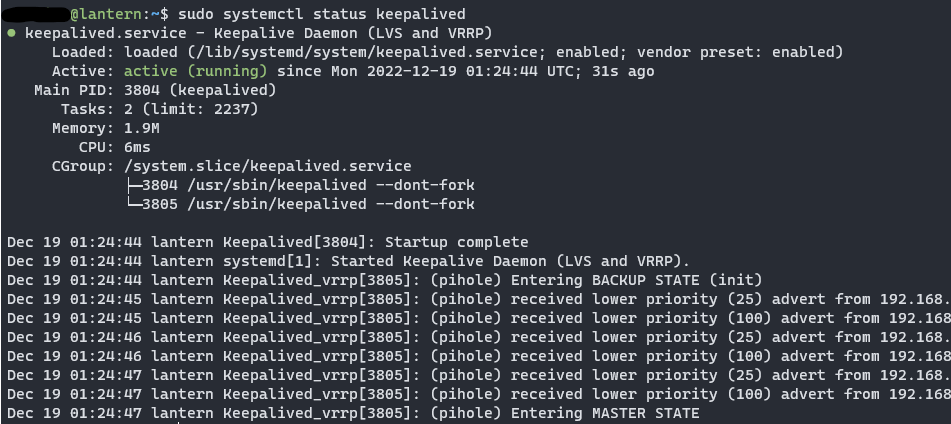
You can check the service with the following command also
1
sudo systemctl status keepalived
Configuring Local DNS
I use Pi-hole as my local DNS service also, so I will need to add my local DNS records. This can be done in the web admin panel at Local DNS > DNS Records, but for initial configuration, it is quicker to add records to the custom.list file. This is for A/AAAA records only.
1
sudo nano /etc/pihole/custom.list
Records are added as ip hostname
1
2
3
4
5
192.168.1.5 proxmox.local
192.168.1.50 pihole.local
192.168.1.51 pihole1.local
192.168.1.52 pihole2.local
192.168.1.53 pihole3.local
CNAME records can be edited using the web admin panel at Local DNS > CNAME Records, or manually in a different file in dnsmasq.d
1
sudo nano /etc/dnsmasq.d/05-pihole-custom-cname.conf
Entries here will follow a different format: cname:<alias>,<a-record>
1
cname=pihole.ha.local,pihole.local
Syncronizing Local DNS
Now, a critical part of this is that the configuration you set up on your primary node is distributed to the other nodes, so that in the event of a failover your DNS local records still resolve. If you don’t use local DNS, or want to keep things synchronized manually, you can skip this bit. If not though, I’ll show you how to synchronize these files using Gravity Sync.
In the past I tried to keep instances synchronized with rsync, but that proved to be too fragile over time. Gravity sync does a very robust job and just works.
To install, follow the installation guide in the repo, but to overview you will need to run the curl command.
1
curl -sSL https://raw.githubusercontent.com/vmstan/gs-install/main/gs-install.sh | bash
The install script will prompt you for the remote machine. For my usage, my auxillary instances pull their configuration from the primary instance. Once a connection is made, run the pull command.
1
gravity-sync pull
Then you can configure it to run automatically by running the automate command.
1
gravity-sync auto
Auto will follow use the last successful connection made, pull or push.
Automatically Updating Pi-Hole
If you regularly backup your pihole server, you can also automatically update your server. One easy way is to run a script using cron. Create the script somewhere in your home directory.
1
nano /home/patrick/.local/bin/update_pihole.sh
1
2
3
4
5
6
7
#!/bin/bash

# update pihole
/usr/bin/sudo pihole -up

# reboot
/usr/bin/sudo systemctl reboot -i
Then add the script to crontab. It’s a good idea to stagger the different instances of pihole so if something goes wrong, you can catch it.
1
crontab -e
1
0 4 * * 7 /bin/bash /home/patrick/.local/bin/update_pihole.sh
Congratulations, you should now have a high availability Pi-hole cluster!
Additional Sources
- https://github.com/hap-wi/roxy-wi/issues/224
- https://superuser.com/questions/1436063/change-keeplived-process-user-from-root-to-keepalivedor-other
- https://discourse.pi-hole.net/t/solved-pihole-docker-container-unhealthy/17939